BecomeSingers is reader-supported. When you buy through links on our site, we may earn an affiliate commission. Learn More
Studio monitors are essential for any slick home recording setup, providing more accurate sound than regular computer speakers. However, connecting them up can be tricky since there are a variety of cables. And many users complain about distorted, noisy audio.
So I’ve put together this quick guide to show you how to connect your studio monitors to your audio interface. From finding the right cables to accurately placing the speakers, I’ve included tips for getting the best sound quality out of them.
Table of Contents
How Do You Connect Studio Monitors to Audio Interface?
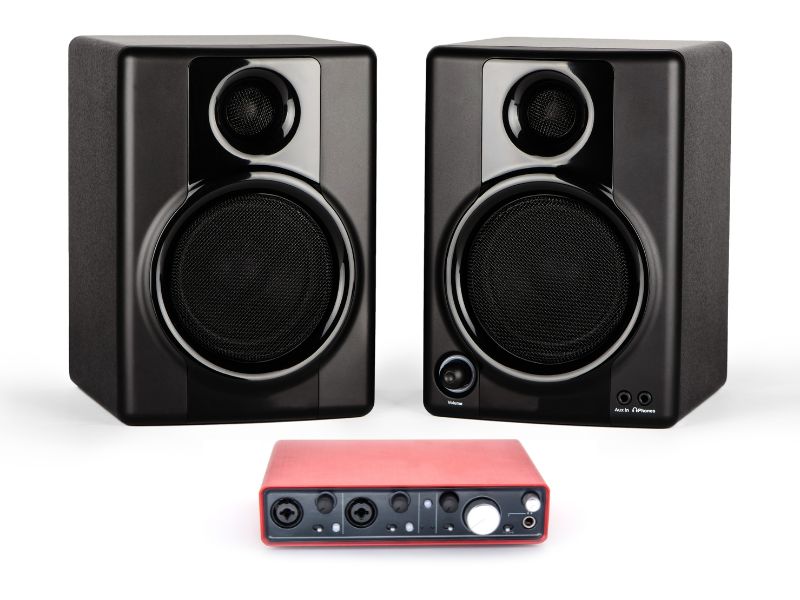
To connect studio monitors to an audio interface, you’ll need appropriate ¼” TRS or XLR cables. Plug the cables into each speaker unit and into the corresponding L or R output of the audio interface. Power up the monitors and the interface, and adjust the volume levels on both.
But if you’re still facing some issues, here’s a breakdown, along with best practices for getting a great, flat, and accurate monitoring sound.
Equipment Needed While Connecting Studio Monitors to Audio Interface.
- Studio Monitors
- Audio Interface
- Cables (TRS, RCA, or XLR)
- Speaker Power Cable
- Computer
- DAW
Connecting Studio Monitors to Audio Interface: A Step-by-step Breakdown

1. Connect Your Audio Interface To Your Computer
First, you should make sure your audio interface is properly connected to your computer, as studio monitors work best only via the interface. Directly connecting them to your desktop or laptop often results in poor sound quality and noise.
While connecting, make sure you’ve updated your drivers to the latest version and enabled all outputs on your interface. Configuring the sample rate and buffer size is important, too, as I’ll discuss below.
2. Check The Cables You Need For Your Studio Monitors
Studio monitors don’t always come with the cables required for connecting them. So you may have to purchase these separately. You can find out the cables required by checking the product page or simply examining the back of the main speaker unit.
The three most popular cable types for speakers are TRS, RCA, and XLR. From these, your monitors may have multiple ports to support multiple cables. I recommend balanced TRS cables for simplicity, but balanced XLR is great too. RCA is older and less reliable if you can avoid it.
But remember to get balanced cables, whether TRS or XLR, as these will reduce noise and interference. Also, don’t get too long cables – take a simple measurement of your studio space and choose an average length. About 6-10 feet usually works well enough. Extra long cables can introduce signal disturbance, leading to poor sound.
3. Place The Studio Monitors Appropriately In Your Room
Before you start making all the cable connections, it’s important to place your studio speakers for the best sound. A good rule of thumb is to form an equilateral triangle between your two speakers and yourself.
To do that, place your speakers at about an equal distance from your working desk, and try to find a sitting position that puts you exactly in the middle of the two. Adjust the units and angle them towards your ears, and make sure nothing is blocking them from behind or in front.
Also, try to get the right height: the speakers should be level with your ears and directly face you. This way, you’ll get the full sound with minimal reflections. Another tip – keep them at least 3 feet away from the back wall to avoid boomy bass reverb.
Placing studio monitors effectively can take quite a lot of experimentation to see what works best in your room, so be patient and keep working with it while listening to some music for reference.
4. Connect The Studio Monitors To Your Audio Interface
Now that you have the cables and you’ve set up your monitors, you can connect everything together. Use one cable to connect the L of the audio interface output to the L input on the studio speaker, and do the same for the R side.

Make sure you’ve properly connected the extension wires between the L and R speakers: these are usually red and black and need to be fit snugly into the extension port.
With the cables, don’t twist or turn them too much. Try to keep a straight, level connection to avoid signal interference.
5. Power On The Studio Monitors
Now you can connect the power cable to the main speaker unit (or to both if they are two active speakers). If you have both two-pin and three-pin options, I recommend going for three-pin for better electrical safety and grounding. Additionally, you should use a surge protector if you can.
Once you’ve checked that everything’s connected, turn down all the volume knobs on both the interface and the speakers. This is important to avoid any sudden loud noises while turning on the speakers. You can go ahead and power them ON now!
6. Adjust The Levels On Both Studio Monitors And Audio Interface
Play any reference song on YouTube, Spotify, or anywhere. First, turn the audio interface volume to the maximum (while the speakers are at zero). Also, make sure your computer volume is set to maximum and is set to output through the interface (usually Outputs 1-2).
Now, slowly turn up the knob on the speakers until you reach a fairly loud volume. It should be clear and detailed. Then, roll the audio interface knob back to about 50% (12’o clock), and increase the speaker volume just a bit further. This gives you more room to play with while mixing and monitoring.
So now, you only have to use the main volume knob on your audio interface to control the volume. I generally keep it around 60% (while the speakers are somewhere around 70%) and adjust as necessary.
Check our guide on White Studio Monitors by James Mann
Tips For Getting The Best Sound Quality And Flat Frequency Response
Once you’ve set everything up, double-check these things to make sure you’re getting the best sound from your speakers and a relatively flat frequency response for accuracy:
- All the connections are tight and secure, with no loose ends.
- The speakers are placed directly at your ears, with enough distance from the walls to avoid boomy reflections. They should also be equidistant from you and each other.
- Treat your room with acoustic foam, blankets, and other noise-dampening materials to reduce room reverb and make your output more accurate.
- Use an EQ: either software or any onboard EQ on your speakers or interface. You can adjust the sound to your personal taste this way. But don’t overdo it.
- Stereo Imaging is another key aspect: as you place your speakers wider apart, your ears can better separate the different elements in the music. So try this and see what works best for you.
- Configure the sample rate and buffer size. You can find these in your audio interface’s control panel. Try experimenting with a few different settings to see what sounds best to you: a higher sample rate may be better, but not always.
And finally, remember to take breaks from long listening sessions. If your ears get fatigued, you won’t be able to appreciate the nuances of the music.
FAQs
What can you not do with studio monitors?
Do studio monitors sound better than speakers?
How do I get the best sound out of my studio monitors?
Conclusion
Now that you know how to connect studio monitors to an audio interface, it’s time for you to start setting up your home studio. Don’t forget to experiment with the placement of your studio monitors until you find the sweet spot – this will make a big difference in the quality of your recordings. And finally, take some time to adjust the levels on both your studio monitors and audio interface until they’re just right.
I hope you can use these tips to create professional-sounding tracks from the comfort of your own home. If you found this helpful, share it with your fellow musicians, and feel free to reach out to us with any comments or questions!


